Resize or Resample your Photo?
When to Resize/When to Resample
The two effects, resizing and resampling, are often taken by photographers as accomplishing the same thing. They are in fact, used for completely different purposes and as a result should be understood in order to correctly get your work done. The reason they're confused is that they can both increase or reduce the size of an image.

Web or Display Size = Resampling
Because you are placing a photo on a website you can eliminate the confusion of changing the Document Size (print size), by staying within the Pixel box, and typing in the size you want the image to be seen at, and by leaving the Resample option checked and only changing the pixels. As you will notice the resolution does not change, but the size in the Document box does. This is not a problem and is the way it works. So many pixels equate to so big an image size. You can see below that by leaving resample checked and reducing the pixels for a small web upload, that this has also reduced the print size. This is fine because we are not printing.

Print Size = Resizing
In this case since the object is to get a print we need to uncheck the Resample option so that we are not changing the pixels of the image, only the size of the printed document. You'll notice when you uncheck Resample that the upper pixel box is grayed out so that you cannot make a change to the pixels, yet you can raise the resolution for a quality print. Notice too that the two other options, Constrain and Scale Styles are also grayed out. This locks the proportions of the image.
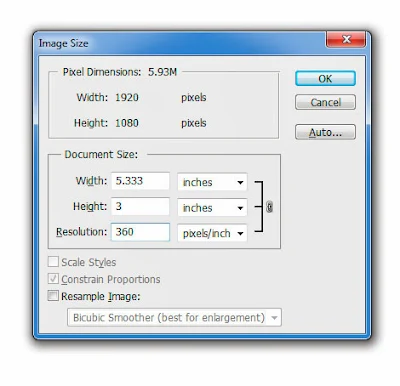 Here we have chosen to print. By unchecking the resample option, we can no longer remove or add pixels. We can only apply a printer resolution and we will be printing at whatever the resolution we have chosen allows us to print at, which in this case if we want to print at the Epson printer advised resolution, we choose 360 dpi, so our image will only print at 3x5.333". We can certainly lower the resolution and get a really nice print even as low as 140 resolution which would give us almost an 8x14" print, or another variable we need. But the larger we choose to print the harder it gets to achieve a really nice print at lower resolutions.
 Nearest neighbor is not a choice I would recommend, it is left over from days when other options were not available. The newer options are much better. If you are enlarging a photo for a bigger print, choose Bicubic Smoother, as it smooths out the pixel edges slightly, when they are spread farther apart and makes for a better print. Keep in mind you'll be clicking the resample option and then typing in a resolution, which will then force your pixel dimensions to increase.

Larger Prints
Since in some cases we need to print larger, the first thing we have to know is our camera must be capable of higher pixel counts due to a high quality sensor. In this case if we started out with a pixel dimension like the example above we would be limited to a fairly small print without sacrificing quality. And unless one is printing a poster to hang on a post, the files size, or the pixel dimensions need to be much higher. However there is a way to enlarge to a certain degree. At the bottom of the image Size box, shows some choices for changing the size of your image file.

Now comes the question how much can I increase the size of my image file and how big a print can I get? This is where common sense and print proofing come into play. Even then you will only know by printing a sample and thus spending money on precious little ink that comes in those small tanks sold for your printer. But to give you a very rough idea, if you have taken a really well focused image, with a fairly high resolution camera, and a clean lens on a tripod, you can easily get a 100% increase in size, maybe even double that. But nothing other than your eye will know that until you print it.


Comments
Post a Comment
Comments