Getting Inside the Subject
When to Ignore the Subject
Or when to get inside the subject of what you are shooting. In another word, how, while shooting your subject, you can achieve bokeh. For anyone unfamiliar with this term, bokeh is the surrounding out of focus (oof) area. I will add a link below to a video tutorial I recommend from a photoshop expert.
I ran across this old hay rake from the early 20th century just a few properties away. The rake, my subject of the shoot, looked great and I shot it from several angles, but I wanted to see the details. The metal was pitted from rusting for decades and I thought it would make a great secondary subject so I began to explore the rusty parts.
I ran across this old hay rake from the early 20th century just a few properties away. The rake, my subject of the shoot, looked great and I shot it from several angles, but I wanted to see the details. The metal was pitted from rusting for decades and I thought it would make a great secondary subject so I began to explore the rusty parts.
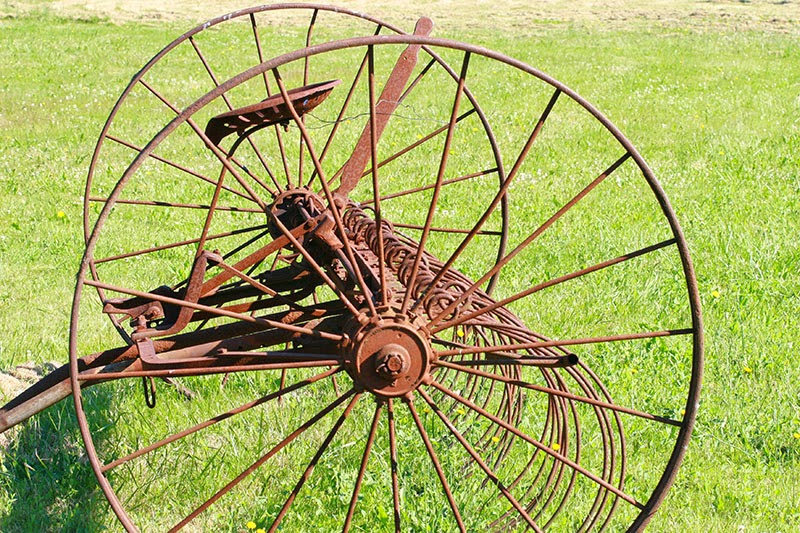
When I first chanced upon this hay rake, I was headed for a trail I
frequent and my camera was fitted with my 70-200mm F2.8L IS, which
could have done a fine job, but I didn't want to have to do a lot of manual focusing, which I tend to do when reaching in for this type of shoot, so I headed home and switched to another lens. The Canon 85mm F1.8. I knew to be careful with this lens since while it is quite sharp wide open, in order to nail a super sharp image it is best to stay at f2.8 and since it was a bright day it nailed the focus beautifully. Take a look at the first shot I took with a mid-point depth of field focus.

Getting Inside the Subject
I was able to grab a front and rear bokeh with mid-ground sharpness, since I had the aperture set to 2.8, it was a bright day and I was using the hay rake itself as a tripod. Front and rear bokeh is often a technique used for technical advertising on any subject. It could be a cell phone, the interior of a refrigerator, the cockpit of a Lear jet or anything when the details are important to capture. I call this Getting Inside the Subject. It's a nice technique for demanding and directing the viewer's attention to a specific area in the image. For an ad it can literally and subconsciously force us to focus, pun intended, on exactly the object they want us to focus on, say the stitching on a leather seat rather than the entire seat. And for a photo of a person in a crowd it demands that we focus our attention on one face in a sea of faces or just the eyes in a portrait, if done well. Some lenses do a better job than others, but the important parts of achieving bokeh are as I included above, the light must or ideally should be high, or the ISO can be raised, though that is not the ideal solution, the lens should be a faster, wide lens and the aperture should be wide open or with an f-stop to get grab a sharp focus on a single given area of the photo. Sometimes that are is within a very shallow area, sometimes it is deep area of the image. But practicing with any lens you have can get you started. If your lens is of smaller aperture, then get a focus and physically move toward or away to see if you can manage any semblance of bokeh. Though using a smaller aperture lens, the results will not be nearly as satisfying or you may end up with the whole field of view in an out of focus shot, so pick your widest aperture lens if you have one.The Technical Side
Is there such a thing as bad or good bokeh? Well technically speaking yes. There can be better or worse bokeh. And it may take you some time at gaining the best bokeh. Since bokeh is the tendency to rule out focus, then also how it does it, counts too. Because a lens priority is to focus then getting a part of the field out of focus has a lot to do with the lens itself. So a lens with a small aperture, or a slow lens, has great difficulty in achieving this, so called spherical aberration, which pleases the eye. Good spherical aberration is when a lens displays our image with light gathering in the center of the out of focus background or foreground objects, but in a way that leaves the edges of that light fully out of focus as well as the center of that light. Even to the best photographers whose passion it is to create wondrous images, this technical side is quite boring, and part of that is due to creating bokeh is less a science than it is art. So with that I'll stop the technical evaluation and leave you to get practicing.
But Wait, There's More
A couple of examples, but I should explain, these are only included as a way of further defining an non-ideal bokeh vs an ideal bokeh, so don't confuse these two examples with genuine bokeh. The first image is a way of demonstrating why we see a bad bokeh, as unpleasing to the eye, and the second image as why our eye is more pleased with the soft overall out of focus bokeh.


Here is that video tutorial I mentioned earlier, demonstrating how bokeh can be created after the fact, in Photoshop through the use of Gaussian Blur. It is from Howard Pinsky, a Photoshop Wizard, of Ice Flow Studios
Subscribe by Email


Comments
Post a Comment
Comments