Sunday, December 22, 2013

Merry Christmas and Happy Holidays


 Merry Christmas

Happy Holidays

to all our readers


I'd like to wish all of you the very best of Christmas and all Holidays celebrated at this time of year across the globe, and remember to remember those in need, to those we've let slip from our lives for any reason. They are still out there and deserve your love and your attention. Please be with them.


Add a Comment Below

Saturday, December 14, 2013

Why Do You Do Photography?


Why Do We Do Our Photography?

Ever wondered what it is about your photography that keeps you going? For some of us it is the ability to sell it online or in galleries, at local shops, at events, doing wedding shoots or sports, portraits, on greeting cards, mouse pads, or coffee mugs. For some of us it is just about the social interaction on sites where feedback or tagging is as much a function of the photograph as is the actual picture taken. And finally for some of us it is about gifting to friends and family. But there is a higher reason for some of us, it is quite literally a reach into our souls for a profound effect on our spirit.

We Simply Love what we capture 

 Our photography ends up somewhere, and some of it we delete, some we hang onto because we possess a delusion that somewhere down the line, we might use it for some be able to utilize it for one legitimate attempt at an artsy effect, and then there are the few images that is the real reason we continue to shoot: We Simply Love What We Create.


There lies the difference in a professional photographer, whose income relies on his time behind the lens and his number of customers. But for myself, it matters not if these photos are turned into currency. It matters only that the result may have a profound effect on me or others who view it, much like a poem effects one because it has relevance to their lives. Sometimes it is merely the capture itself. And at other times it is the post-processing to fully dramatize, to enhance the image, in a way in which I would have liked the capture to have been when I discovered it. It is in short the art of the photo. 

I have given some thought to what will happen to all of my photography once I am gone. Not that I am looking forward to that, but make no mistake, eventually that will occur. And I think my fondest hope is that family members will distribute all that I have printed and all that I have saved to hard drives, to each as they wish, or hang on their walls. If they think of me once in awhile, that is all the better, but the truth is, I wish them and friends they may choose to gift to, that my photographic art give them comfort or inspiration in their homes or businesses and workplaces. Outside of the pleasure that my best work gives to me, and I find great pleasure in a small portion of my work, I will be very happy if others find it as pleasant to enjoy in their lives.

And sure, I have it listed for sale on a couple of sites, and sales come, but it is the love of the art of photographing places and people, nature and life, more than any other reason, that I continue.

What are your reasons?


Add a Comment Below


Thursday, December 12, 2013

Visit National Parks in the Winter


Subscribe by email to Shooting Outside Blog


When we need inspiration as photographers, we can always turn to our National Parks. Here's an article written by Katie Eucker I found at the National Parks Conservation Association.

5 Tips for Visiting National Parks in Winter

Posted on: December 2 2013

5 Tips for Visiting National Parks in Winter

By Katie Eucker, Senior Manager of Travel & Corporate Marketing
Visitors bundle up to watch wildlife in Yellowstone's Lamar ValleyAs the manager of NPCA’s ParkScapes travel program for the last seven years, I’ve planned national park trips for hundreds of park lovers all across the country and in all seasons—Texas’ Big Bend in the spring, California’s Yosemite in the autumn, Montana’s Glacier in the summer, and even Alaska’s Denali in the winter. Winter adventures are some of my favorite trips.
If you’re thinking about a national park trip this winter, here are a few tricks I’ve learned over the years.

1. Plan for an extra day at the start of your trip. If traveling by plane, consider planning to arrive at least one day in advance of your park visit. While this advice will help travelers feel refreshed at the start of a trip during any season, I find this suggestion especially beneficial in the winter. Arranging an extra day at the front end of the trip means you have built-in flexibility for weather delays in your hometown, connecting airport, or destination, and helps account for adverse road conditions for visitors traveling by car.

Bison in winter at Yellowstone National Park

2. Get to know the gateway community. Whether traveling through a town before entering a national park, filling up at the local gas station, or staying at a hotel in the neighboring community, I love striking up conversations with the people who live and work in these gateways to our national parks. Not only might locals know the best place for a slice of pizza or the best deal on a good cup of hot chocolate, but they also often know little-known facts (read: fascinating stories) about the park in their backyard. These conversations are particularly useful in winter because area residents will know of adjusted hours or seasonal closures during the “quiet season.”

Mammoth Terraces in winter at Yellowstone National Park

3. Don’t be afraid to try something new. You may be planning a trip to a national park around a favorite cold-weather activity, like cross-country skiing in Acadia, snowshoeing in Yellowstone, or downhill skiing in Yosemite. You can make it a multi-sport vacation by renting equipment from a local gear shop or even from concessioners inside the park. Now there’s no need to lug bulky equipment on your next park holiday, and no more “lack of equipment” excuses holding you back. So pack your winter layers and get out there to give it a shot.

Visitors at Upper Geyser Basin in Yellowstone National Park

4. Drink plenty of water. Staying hydrated is just as important in the wintertime as in the summer, but our bodies don’t let us know we are dehydrated in quite the same way, and we may not always recognize we’re thirsty during cold-weather activities. My favorite winter trick is to drink warm water from an insulated thermos. I’m channeling my mother here when I remind us all to, “Hydrate, hydrate, hydrate!”

A coyote in winter at Yellowstone National Park

5. Don’t get caught in the dark. We all know that winter brings shorter days. These precious daylight hours can be even more compressed when traveling, especially closer to the poles. Another important factor is where a park is located within a given time zone. Visiting a park in the eastern part of a specific time zone will mean earlier sunrise and sunset times than other parks in the same zone. For example, the sunrise and sunset will be much earlier tomorrow at Acadia National Park (6:51 a.m. and 3:54 p.m., respectively) than Sleeping Bear Dunes National Seashore (8:01 a.m. and 5:03 p.m., respectively) because Acadia is located much farther east in the time zone. Checking daylight hours ahead of time can help ensure you will have enough daylight hours for your intended daily activities, and that you won’t get surprised as darkness falls.

These are just a few things to keep in mind during a cold-weather journey. Got your own tips? Share them with us below!
If you are thinking about a winter adventure but prefer the ease and other benefits of a small group tour, consider joining an NPCA ParkScapes trip to ring in the New Year. We offer special holiday trips to Yellowstone and Yosemite
 that feature these snow-covered landscapes.

  And they can use our help, consider making a tax deductible donation


Monday, November 25, 2013

Mac PRO Sells for Almost a Million

Subscribe by email to Shooting Outside Blog


Apple Mac PRO Auctions at $977,000


One-off (meaning one-only) product designs created by Jony Ive and Marc Newson sold at a special (RED) charity auction at Sotheby’s in New York City over the weekend, with the pair’s four designs smashing all bidding estimates.
The Mac Pro, for example, was expected to fetch between $40,000 and $60,000 but ended up going under the hammer for almost a million – $977,000, to be precise. The auctioned model of Apple’s high-end powerhouse PC looks identical to the recently revamped model except for one difference – the color. The regular model, which goes on sale in December with a starting price of $3,000, has a black exterior, whereas the auctioned model is red. Let’s hope Apple popped in a bit of extra memory for the buyer’s additional $974,000.
The solid gold Apple earbuds, meanwhile, were picked up for $461,000. Yes, $461,000. These were expected to go for no more than $25,000.

So much of the world loves the Apple product lineup and has for many years that the anticipation that a one-of-a-kind model will fetch as technological art, nearly a million dollars, and further that it will certainly raise perhaps half again as much in 2-3 years seems ludicrous. But for those with more money that they can spend on reasonable living expenses seem to always find a way to astound us by reaching a height that is laughable. An earbud set for nearly half a million dollars? Of course the goal was a charity for The Global Fund to raise money for a variety of causes, including AIDS programs in Africa. That's certainly an honorable goal, so I'll reserve my critique for another day. Just thought you'd be interested.


Subscribe by email to Shooting Outside Blog


Add a Comment Below

Saturday, November 16, 2013

New Art at Fine Art America

Subscribe to Email Updates


New Art at Fine Art America

by Rich Collins


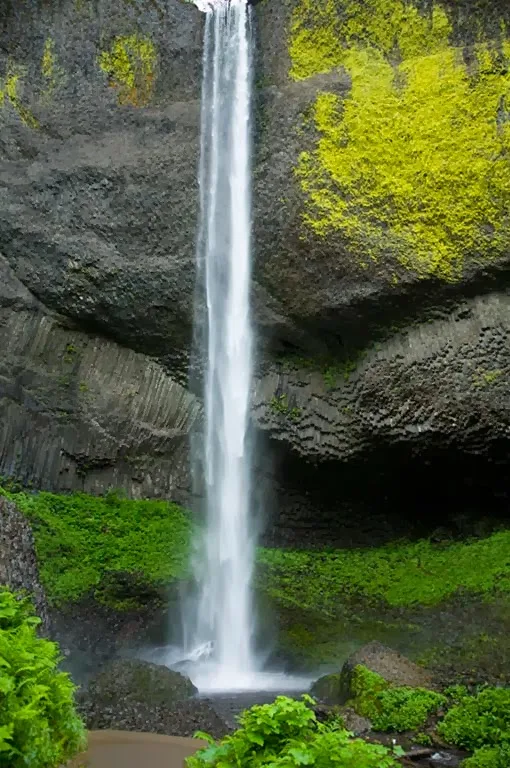
Latourelle falls is an amazing waterfall scene to hang on your wall. There are so many views, this one of its thundering crash into the pool and cascading boulder. It lends a both a dynamic and calming effect in any room. And a 16x24" is only $61.55 unframed, unmatted on Luster Paper, or a metal Print at $125.95 plus shipping.

View to Purchase Any Size at my Gallery

One in a series of Latourelle Falls


Subscribe to Email Updates

Tuesday, November 12, 2013

New Art at Fine Art America


Latourelle Falls 4a 


Latourelle falls is an amazing waterfall scene to hang on your wall. There are so many views, this being a perennial favorite, with the slim falls and the massive rock wall behind. It lends a calming effect in any room. And a 16x24" is only $61.55 unframed, unmatted on Luster Paper, plus shipping. 

Get this print before the New Year prices go into effect.

View to Purchase Any Size at my Gallery

One in a series of Latourelle Falls


Subscribe to Email Updates

Monday, November 11, 2013

Honoring Veterans Day


Honoring Our Veterans


From the earliest of battles to the present day, on this day we honor our veterans for having served in action, in so many ways. Some with a single flag in ceremony of the freedom we all enjoy. Others are able to celebrate this Federal Holiday by choosing to join one another in prayer at their churches and in communities at parades. We here at Shooting Outside wish all veterans of all wars and actions worldwide, a grand thanks. 

Sunday, November 10, 2013

Wednesday, November 6, 2013

Medium Format, Do You Have What it Takes?

Subscribe by Email to Shooting Outside


Thinking in Terms of Going Medium Format? 

  The Mamiya 645DF+ with 40, 60 and 80 megapixels, starting at $13000 with a 90mm lens and digital back

If you're like me you've at one point or another considered shooting MF, (Medium Format). The lure of capturing photos which can be enlarged to huge wall prints is attractive for all the right reasons. Imagine gracing your home with extra-large prints for the look you see only in the very best Parade of Homes residences. Even in smaller homes the effect that gives is beyond compare. Or for the photographer who sells their art, it offers yet another market to reach into. Or, if for no other reason than to gain a truly better exposure, the reward is unparalleled. 

But Do You Have What it Takes?

First off it takes money but we'll get into that later. The ads and descriptions from sites that sell these MF bodies and the manufacturers that make claims, all seem to lead us to believe these accomplishments are nearly effortless. The list of the camera's abilities are long and include functions that make our current cameras appear limited by comparison. And I am absolutely positive there is a long list of buyers which have bought these bodies and after many frustrating outings have discovered that achieving the results they were lead to believe, have either sold them, or have them sitting in a closet collecting dust. 

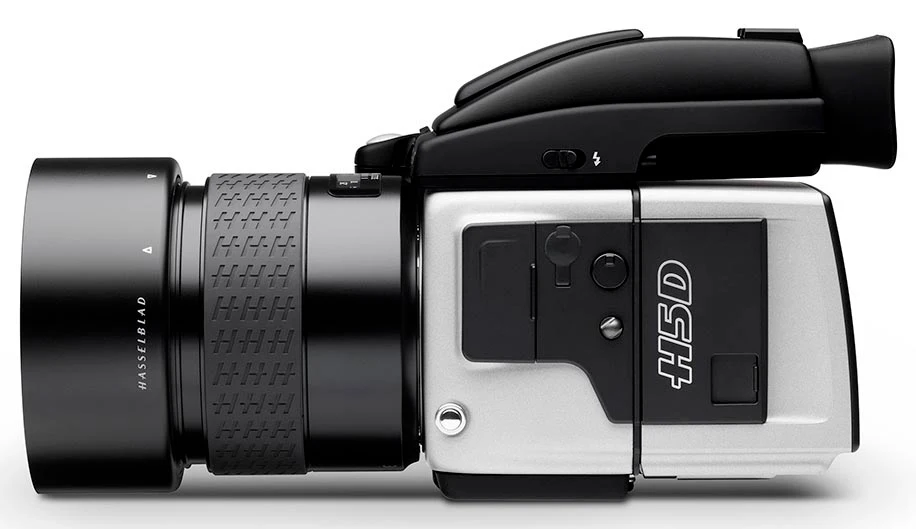
 The Hassedblad H5D with 40, 50 and 60 megapixels starting at $17,995.00

There is a lot to consider when laying out that hard earned cash for a very expensive medium format system. Let's look at getting a sharp exposure, before we discuss anything else. What exactly does it take? Here is where I defer to what most all of us would refer to a medium format expert, Joseph Holmes' article 'GETTING TOP QUALITY FROM MEDIUM FORMAT' in which he writes a voluminous article that you can enjoy at your leisure or choose to read my brief on some of his points.When handling an APS-c sensor reaching a good focus is almost inevitable, with only the press of a shutter button. Moving to full frame, with AF Focus on and in Auto Mode, it is almost always a gurantee also. But when using a MF camera, in Manual Mode and reaching for the very best capture that the camera body, the digital back, the lens, the tripod, and you can manage, it is another matter entirely. 

You can expect a much sharper image because MF cameras do not utilize an anti-aliasing filter, a filter effect that tends to soften,  however you'll need to possibly do some post-production work if moire shows up.

Once set upon a tripod of some considerable weight for stability, you have a subject in your viewfinder, you must consider your vision and its ability to focus at the distance you wish to capture true focus. It follows that almost everyone will indeed find the best focus with the aid of a monocular. You will also need to calculate the effect of even a gentle breeze, slight if unnoticeable movements in the earth, your breathing and your hand's steadiness if not using a cable release or wireless remote, then by using AF Focus achieving what you see as the very best you can get, then turning off AF Focus and manually focusing to the best you can see (using the monocular) and only then tripping the shutter. All of these contribute or detract from your very best focus and sharp image. Only you will know which ones you will need more work on to accomplish as close to perfection as you can, for an enlargement which fits your wall or a client's. 

A monocular aids in seeing the focus within your field of view for your subject; once AF has focused, and you have manually attempted a better focus, I promise you,you will not be able to do this better without one. 

Every sensor is calibrated by plane of focus and some are dead on and some are not, leaving you with a less than perfect focus. In some cases the dead center of the sensor to the optical axis of the lens, can be no more off than 12 microns, the equivalent of 1/8 the thickness of a sheet of laser printer paper, or 0.012 mm. Then there is the focusing screen in the camera. it too must meet stringent alignment engineering and then mechanical placement, and we will find this in varying degrees of alignment, if we do test shoots. The trouble is 99 99/100% of us do not do this, so our shots are never going to achieve this close to perfection focus. 

Now the digital back is also calibrated and as often out of alignment. In Joseph Holme's article he mentions one of the ones he used, 175 microns out of alignment. That's enormous. It is also improbable to sort out the out of alignment issue down to the camera or the back without using more than one of each. The camera and digital back manufacturer will tell you their products are tested and zeroed in to perfection. Do not trust that. Not even on the very most expensive bodies, backs or lenses made, as his article will bear out, he found that was not true. This si also why I have moved form one body to another in the Canon line. I don't for a minute believe that any manufacturer of higher end products designs into their products quality assurance testing procedures, a less than best-effort attempt to release for sale the best they can, however I do believe it happens. Enough said. Expect it and then take the product back and replace it with another if this issue is important to you. And if you question this, read Mr Holmes article 'MEDIUM FORMAT DIGITAL CAMERA OPTICAL PRECISION'.
  

On to The Lens 

You would expect a lens to be sharp from the factory, but not usually a good expectation. It is up to you to find out by testing it, if your goal is to get the very best sharpness from all of your camera system's components. And Medium Format can not overcome any discrepancy in your lens sharpness. You can go through Holmes directions, through the use of a power pole, about half-way down the page on the first link above, or you can try the LensAlignMII at MTapes Design Store for right at $80. I have done this on most of my lenses and doing it yourself is not very difficult or time consuming but you do need to commit an hour per lens in the field and perhaps another hour on your screen. And if you find after doing the tests, that you have unsharp corners in your lens, that is the areas which are on the outer peripherals and not the center, there is nothing you can do about it if it is out of warranty, simply because the cost of realigning the glass inside a lens is more than replacement. Of course what that means is that your bad lens is now in the hands of another unsuspecting photographer. My advice is to buy new only, and test immediately then return until you finally receive sharpness in the corners. Here i suggest you take the time to read in full David Holmes article. 

Locking up the Mirror

When the shutter button is pressed the curtains involved swing into position and cause a tiny vibration, which definitely transfers to the image sharpness, that is, lack of sharpness. We don't want that. So we use the menu setting to lock the mirror up so that all we are doing now is opening the lens, as the shutter button is pressed. Now in saying that we realize that some lenses have inside them micro motors which are buzzing as we find auto focus, but usually they have already stopped by the time the lens fully opens and the image is captured by the sensor.  Locking up the mirror is vital in getting that near perfect capture, when considering a major enlargement. If you want to see what a really well focused image should look like zoomed at 100%, try this one at Better Light, then look at yours.  

Now do you have what it takes to go Medium Format? And I'm not talking about the money, which is considerable once the entire system is built.


Subscribe by Email to Shooting Outside


Sunday, November 3, 2013

Easiest Wild Animal to Photograph


What's Your Choice for Easiest Wild Animal to Shoot?


Marmot, Squirrel, Ground Hog, Woodchuck, Rodent, Whistle-pig, Land Beaver, or Varmit?

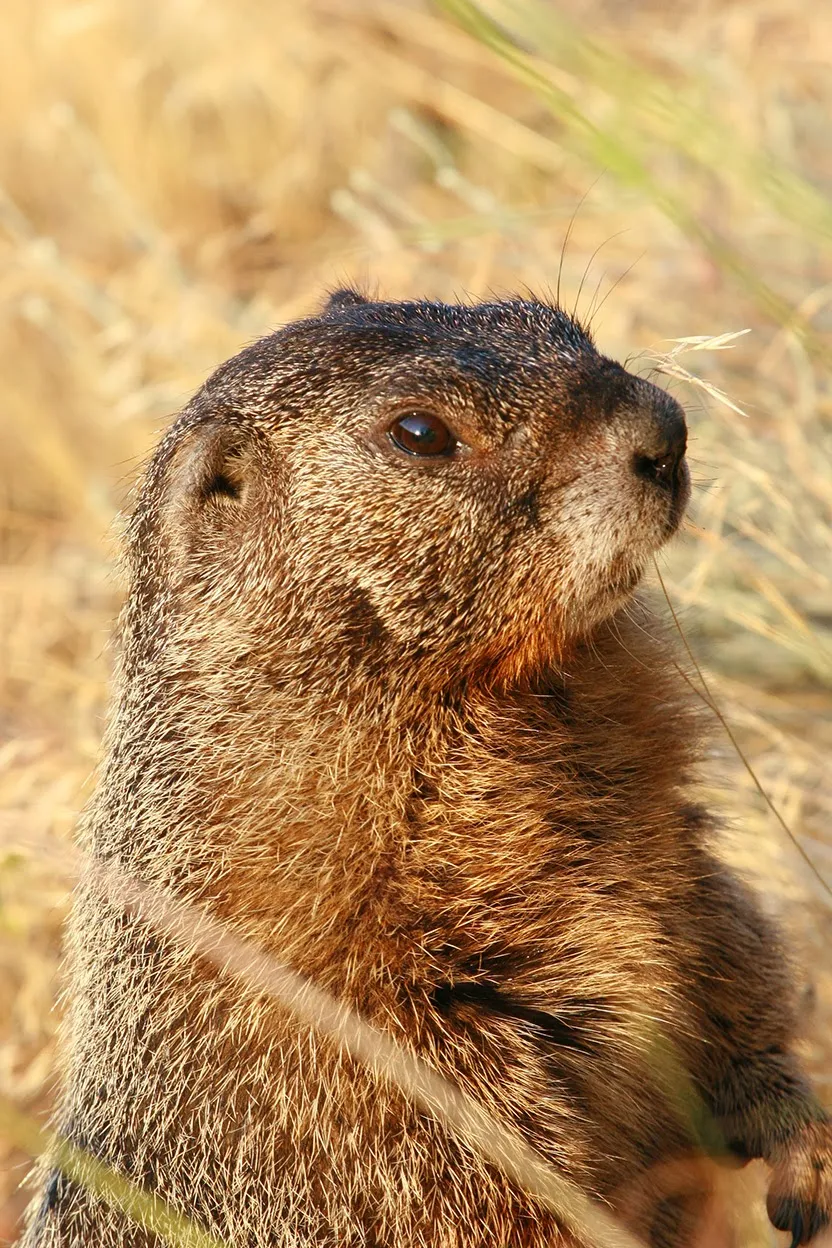
Actually all of the names above have been used to describe this member of the squirrel family and all of them are correct, including Puxatony Phil. With the possible selection of the birds which frequent our yards and parks, though we don't normally think of birds of this genre, of a wild animal, my guess is the common Ground Hog. I visited Palouse Falls State Park in Eastern Washington and upon arriving in the early morning, it was nearly frosty out. Quite chilly on a July morning for that part of the country and had come to shoot the falls from a very high promontory viewpoint, so by the time I had taken out my gear, set it up and shot for an hour, I relocated to an alternate area right off the parking area, and then set up again for another shoot of the falls. It is a real gem of a waterfall to photograph, partly because of its height. It drops 143' taller than a full quarter mile; 768 feet, or 234 meters. As I shot adjusting for the morning light coming directly into my lens, since to get another view is nearly impossible without the use of climbing gear, I noticed from the corner of my eye, not 20' away, a marmot. It was not moving much, but had placed its body length to catch the light from the sun, so as to warm up prior to any serious movement. It was so lifeless that I couldn't even detect breathing.  It's eyes were closed. So I continues to shoot the Palouse waterfall until the marmot's slight movements again caught my eye. And what really caught my attention, once it woke fully was it patient attention to my presence. 

Not that I felt it was fearful of me, quite the contrary, even when I leaned over the fence to get a closeup, it only perked up as is my impeding upon its territory was an invitation to it. Suddenly it came right toward me and ended as close as it felt was comfortable just 3 feet from the safety fence I was behind. I decided at that point this must be the easiest wild animal to shoot and later discovered why. It apparently is common for visitors to offer them peanuts, which because they are of the squirrel family, Sciuridae, pleases them no end. I didn't have any peanuts nor would I have fed it as I am a believer that wild animals need to fend for themselves, or we risk pulling them from their innate ability to find food from the wild and not the parking lots. So there he/she stood, awaiting a free lunch which would never appear. never, that is, until the next visitor with a bag of peanuts arrived. 


I could literally have reached out with my hand to feed this marmot and because of past experiences with other human visitors it had no fear whatsoever. 

What wild animals have you been getting pics of lately and what wild animal do you consider the easiest to shoot?

Subscribe by email to Shooting Outside Blog


Saturday, November 2, 2013

Reflections on a Lake

Subscribe to Shooting Outside by Email


Reflections on a Lake


Reflections on a Lake is meant for a quiet room, a den or library, an office or Boardroom, a bathroom, a bedroom or a dining room. You can purchase any size offered at my Gallery at Fine Art America online. And if the size you are looking for is not available, let me know in the Comments section or via email below. 


Location of Lake

I found this lake on a drive to Mt St Helens, and until recently I had forgotten the name and the route I took. It is called Silver Lake and it lies WNW of Mt St Helens., and East of I-5 by about 6 miles on Hwy 504. That I happened to catch a shot of this foggy quality on a very cool morning in December of 2007 was fortunate and lucky. I have sold this photo for placement in homes and offices over the years and it always looks great on the wall. One client placed it on their fireplace mantel, which when printed at 20x30" transforms their living room into a tranquil gathering place. 


  Email Me for a specific size request


Thursday, October 31, 2013

Ghastly Halloween Pumpkin

Ooooooh Scary


My Grand Daughter designed while I carved this Ghastly pumpkin and then asked if I would "Please GrandPa, put this on your blog". How can you resist a Grand Daughter? So here you go. These are the ones she chose. They are in order of her choice and they are sized as she chose them to be.


When I asked her how she wanted her pumpkin carved she said, "I want it scary GrandPa". Ok sweetheart here's my scary carving. Tonight she and her parents are hunting sweets while GrandPa is home waiting for the spoils of victory. Good luck Sweetheart.

Wednesday, October 30, 2013

Answers to your Photography Questions


Subscribe to ShootingOutside by Email

Free Photo Questions Answered Today


If you have a photography question, you can ask me here in the Comments Section below. I'll do my best at answering them  within a day, but I will limit the time this is available, and there may be times when I'll send you to a link where I've located your answer if I am really busy.

And don't fear asking tough questions. The basis for most tough photography techniques is grounded in simple science, even if the image comes out looking artsy. So fire away on subjects ranging from Photoshop, shooting mechanics, lens and camera use and settings, white balance, portrait, macro, memory card, hard disc drives, computer set up for photography use, RAID storage and backup etc.

But be quick as time runs out at midnight, tonight.


Subscribe to ShootingOutside by Email


Sunday, October 27, 2013

Backup Hard Disc Drives Time Again

   Google+ this Post 


Fall a Good Time to Backup and Cleanup Drives


For whatever reason I started a long time ago, going through a full scale backup and cleanup of all of my image files. Its a good time of year for me as the lack of warm weather allows for some indoors file management. Perhaps you too can begin this habit. 

 Accidents Do Happen

We don't want an accidental loss. once a hard drive dies, it does so in a complete and total way, in some cases. If the loss occurs because of platter or drive head damage, temperature limits, or any other type of internal failure, and you haven't taken the time to back up your data, in this case photography, you'll find yourself wishing you had kept a regular backup procedure in the works all year long. All of your data will be forever lost. I have a habit of doing a synchronous backup, that is files which are new or have had any changes made by a photo editor such as Photoshop or Lightroom, each time I download image files to my computer. This way you are not having to do a full backup every time and the process takes much less time.  You can find software or use an Apple or Windows synchronous setting for this. Do the research and find out which companies you prefer and what their particular products offer for the money. This article is not an exhaustive read, but done only to encourage you to follow through in doing backups so you don't lose any of your photos. 

Internal, External, CD/DVD, Flash, RAID or Cloud

I don't care what type of storage you use, make sure you have at least one more copy on some alternative type of media. Even using a network appliance application, such as RAID-1, you will need another backup. Even using the Cloud for storage, you will need another backup. No one can foretell what might happen to a cloud storage backup because of fire or theft, or an inside employee develops a bad attitude. This is true of all types of storage. Make sure you have an onsite copy, an off-site copy as well as a CD/DVD copy. And if your photography has monetary value, as when you are a company with image files for sale, even a cloud copy is worth the time and fee. Just do your research for the costs. I haven't added those options in this writing as so much changes so fast that you'll want to read up on reviews and costs in real time.   

Whenever you download from a flash card, a memory card, make sure you have it on your internal hard disc and an external hard disc, then follow up later with a CD/DVD copy, as a normal part of downloading. We all have to get away from the momentary need to see what we captured, because stuff gets in the way of following through with a procedure to do all the proper backing up and saving. And when your photos are valuable, consider a RAID setup. I will be using the RAID-1 configuration soon, and in addition I will have another backup hard disc.

I used to keep a copy of my photos at work, but when I discovered that hard disc had been stolen, I no longer used that strategy. This is why all of the options are mentioned. It only takes the loss of a single photo, or all of them, to make you wish you had started such a program.

The Cleanup Portion A Must Do

I have mentioned this on numerous occasions and I'll continue to mention this. It may seem incidental and unimportant at first glance, but I promise you it will make your photo editing time much more efficient in the future. And I'll freely admit I am not perfect at this. I will take an hour or two every so often with files I have previously downloaded just for this purpose. I am speaking of post-download, deleting, starring and creating separate folders for saved photos, and naming them so that when searching for a specific type of image I can more easily and quickly locate them. Go through your files and toss the ones which you feel have no future significance, and do this for more than one reason. First it will ease the space those files take up on storage media, but even more important it will reduce the time it takes you in searching through your files for specific image use. You may be looking for an image for a holiday greeting card or for a gift, or for a client need. This all take time and any way I can reduce the time it takes, makes a real difference for my workflow.

And One More Thing

Also consider doing a complete image backup (in this case I am referring to the settings and software of your entire system, applications and preferences of the particular system you are using). One company I have just found online which offers a free use of image backups for non-commercial use, is Macrium. Take a look and if you have any suggestions help our readers out by placing in a comment box.  Here's a good read on how to do an image backup using OSX (v10.5 and 6) you can locate latest versions by searching support.apple.com and here's one for Windows backup

Getting this done at this time of year is a good time since you'll find as the weather offers fewer and fewer sunny days makes it easier to do for most of us. Any questions, please add them below. A very good site for discussing storage related issues, by the way, is StorageReview online. I recently asked and received an answer from a helpful staff member Brian, who's been a member since 2009 and very knowledgeable.

Subscribe to Shooting Outside by Email

Thursday, October 24, 2013

Lightroom 5, a Must Have?

  Google + this Post

Subscribe to Shooting Outside by Email


Something Altogether New

Believe it or not I've haven't used Lightroom and don't see why I should. But perhaps you have or want to. This write up is a beginners course, if you will and I'll be learning as well as we go along. Before we get started, you should know that Matt Kloskowski is offering a free look at Lightroom this week FREE for registered members. Better hurry, only today and tomorrow left.

Lightroom is Designed For?
When looking at what the top feature us of Lightroom is, some will say it is the RAW management capabilities, others might tell you it is it's minimalistic features which speed up the editing process vs Photoshop, while others may mention the simple file management. Cnet did a review (Lori Grunin) on 06/09/2013 giving it 4 out of 5 stars. Within the normal Good, Bad and bottom Line descriptions she includes, 

The good: Adobe's latest version of Photoshop Lightroom handles offline images a lot more gracefully than previous iterations and adds some tools that streamline local retouching. 

The bad: Still lacks features that some users might miss, including face detection (and related efficiencies), HDR and panorama tools and beyond-basic video support. 

The bottom line: A nice, but not necessarily must-have update, Adobe Lightroom 5 remains a strong program for working with raw images.

She also states that the upgrade while making some photographers happy may not be enough to pay for the iteration. Then she goes on to list; The biggest news: support for proxy editing of disconnected images, a feature dubbed Smart Preview. Other highlights include an overdue distortion and perspective correction tool, Upright; reusable custom page layouts and page-numbering tweaks in the Book module; a radial filter; the expansion of the spot healing/clone tool into a full-blown healing brush; and the option to insert playable videos into slideshows. Plus, there are the usual myriad small updates. What's not here: still no face recognition or tagging, HDR editing, panorama stitching, or expansion of the video capabilities.   

Is it Worth The Upgrade?

 From what I can tell paying for this upgrade if you are primarily using Photoshop, or using LR4, is unnecessary. Also know that Adobe dropped support for Vista, not a surprise there, and also for OSX 10.6.8, which may not be as well accepted as there may be lots of older Apple systems still using this version. Apparently the reviewer, Lori, while importing her images from LR4 to LR5 stopped the process at 40 minutes with only 10% of progress, waiting to run it overnight. Her mention that she couldn't perceive a performance improvement, her system being a fairly fast one, is another reason not to make the move. Yet when you consider the Smart Preview feature you can work on image files from disconnected drives, once imported and the previews are generated. Then you'd be able to export them back to the normally disconnected drive for storage. Though it looks like it takes awhile to generate the previews, longer in fact than the beta version that Adobe allowed users to try out before issuing the final release of LR5. That doesn't settle well with me. 

And while Lori was happy with the expansion of the spot healing/clone tool, she was not as pleased with the tools ability to produce tone matches in large ares, for a facial example she offered, as it took samples, while working beneath the eye, from the lips once and from the eyelashes in another attempt. And following with the new tool Visualize Spots, she mentions that it had trouble displaying spots only, and felt buggy to her. She goes on to say that the Radial Filter works exactly as does the Gradual Filter in Photoshop, and this leaves me to believe only if you are already using Lightroom in general, will you appreciate this addition. She does like the added new tool called Upright which she states, "...can automatically level an image, as well as adjust vertical perspective correction, with or without cropping to the resulting image area." But she shows two images that show a glitch.


Something that everyone will like, yes there is something at least, is the ability to insert a video into your slideshows, by not only the first frame, as in LR4, but videos that play upon loading, this is now doable. that makes for a much quicker, much easier slideshow with video presentation. kudos to LR5.
If you are creating page layouts for a book, calendar etc, you can now do so using the Book module, however the limiting factor is that you can still only do this for Blurb. She finished with adding that you can now geotag by dragging a photo to a saved location in My Photos, the addition of support for Windows HiDPI, aspect ration control in manual lens correction and aspect ratio overlay that you can enable in crop mode.

What's it Worth to You?

I have to admit it isn't worth the upgrade, though I'm not saying for those who have already paid for the upgrade it wasn't worth it, but I just don't see the $79 in value for me. Got your own opinion? Let's hear it.


Saturday, October 19, 2013

Oldest Photograph Ever taken

Google+ this Post

A Bit Controversial, but "That's My Story and I'm Sticking To It".

Who took the first lightfast photograph? Well as far as I'm concerned it was Henry Fox Talbot. He achieved the first lightfast photo. Lightfast is the ability of any photograph, in this case, to be able to hold the image, be it black and white or color, in the presence of light. All attempts before Mssr Talbot failed to be lightfast. In other words, they faded away. Henry's lasted. 
Here is his 1835 positive of  
  Latticed window at lacock abbey


Rough Crude and Full of Noise

 Obviously this was not in focus. His whole purpose was to develop the technology titled Calotype, or Talbotype, which ending outflanking the technology known as Daguerreotype in that era in causing prints to last. This is really where hanging prints on a wall or placing them in frames all started.  He used silver iodide, instead of silver chloride in the photogenic drawing process and silver nitrate and gallic acid in the development process. Not very interesting stuff today, but in that time it was latest tech news available. And he was not the most photogenic man.


But he did make his process stick. And for that we all have Mr Talbot to thank for all the pictures we are taking today because without him our photos might well not be able to last. Think not? Here's a quote from Wikipedia: Talbot claimed experiments beginning in early 1834, when Louis Daguerre in 1839 exhibited his pictures taken by the sun. After Daguerre's discovery was announced, without details, Talbot showed his three-and-a-half-year-old pictures at the Royal Institution on 25 January 1839. Got any other suggestions? Toss em in the Comments Box please and thanks for any you'd like to share. 

My website if you care to view 


Add a Comment Below


Friday, October 18, 2013

Take Your iPhone 5s, 5c and 5 Underwater with You

Google + this Post

Otterbox Has Done it This Time

From what Otterboxclaims you can now have a a completely sealed iPhone case. To me that means if I'm swimming I can now create underwater stills and movies. That is gonna sell a lot of Otterbox cases. Here is their official line. Actually it's good down to 6.6' of water depth so maybe no diving.


  • Two-piece case with snap assembly for easy installation
  • Internal foam cushions device and holds it in place inside the case
  • Includes an adjustable lanyard for convenient carrying and tethering
  • Waterproof: fully submergible up to 6.6 ft. (2 m) for 30 minutes (IP-X8)
  • Drop proof: protects device from drops up to 6.6 ft. (2 m)
  • Dust proof: blocks entry of dust and debris particles (IP-6X)
The other feature is there is as you can see above, a layer of internal foam for drop protection, as is the case with many of the Otterbox cases. There simply is no other way to go. I'll admit, I don't like having to shell out $90 for a case, but I look at it as an insurance policy on an expensive piece of my technological arsenal.  Snap one up before you drop yours in the bathtub.

And here is a video from Tim Grey of an iPhone5 underwater using a waterproof case. 


Wednesday, October 16, 2013

Top Five Camera Settings in Manual Mode

 Google + this Post

Subscribe to Email Updates

There are 5 key settings which can make you a Much Better Photographer


 Why Are You Still Shooting in Auto Mode? _______________Go Manual Mode


If you're one of those, and admit it if you are, who just want to get the shot and share it, fine. Just keep using that auto mode and sharing to your heart's delight. It's fast and a lot of fun to toss those cute shots up on all the most popular social sites we all know so well. Everybody does it. And there is nothing wrong with it and no reason to stop. Or is there?

If there's nagging little niggle in the back of your head that keeps tugging at a desire to get on track to better shots, remember the five adjustments you need to become familiar with. And we begin this discussion with your camera in the Manual Mode. As we go through these know that when adjusting one of these, Exposure, Aperture and Shutter Speed it automatically adjusts another.

  White Balance + ISO + Exposure + Aperture + Shutter Speed

White Balance


White balance enables your camera to capture colors in a given light atmosphere. What you want to happen, unless you are attempting a creative effect, is to properly asses the light correctly. This way whites are true whites, colors are true to their spectrum. While cameras today, if left on auto white balance perform a very good interpretation of balancing the white or near white areas in a composure, you can do a better job (all things being equal), by looking at the light and the white, and setting the white balance to different Kelvin scales by simply choosing from the following; Sun, Shade, Cloud, Incandescent/tungsten, Fluorescent, Flash (or Custom White Balance if your camera offers this last option. this way you have now become the judge for lighting. If you choose in the settings menu, Tungsten for example, because you are indoors and the bulbs are the old style incandescent, you have more information now than your camera does. you know for a fact that it needs to expose for that type of bulb. Similarly if you are out in the sun, you can choose sun, shade, Shade and so on. Or you can go to Custom White Balance, you would take a picture of the brightest subject in your frame, then go to Custom WB and click on the picture OK. Then you would want to go to the white balance button, here I am referring to Canon upper end bodies though you'll need to refer to your manual, and press the white balance button and move to the tungsten bulb icon, then recompose and take the picture. Or you can set the Kelvin at a particular number. Below (1) you can see the Kelvin numbers as they relate to varying sources of light, so you can attempt even more accurate white balance settings.

Temperature Source
1,700 K Match flame
1,850 K Candle flame, sunset/sunrise
2,700–3,300 K Incandescent lamps
3,000 K Soft (or Warm) White compact fluorescent lamps
3,200 K Studio lamps, photofloods, etc.
3,350 K Studio "CP" light
4,100–4,150 K Moonlight[2]
5,000 K Horizon daylight
5,000 K tubular fluorescent lamps or cool white/daylight compact fluorescent lamps (CFL)
5,500–6,000 K Vertical daylight, electronic flash
6,200 K Xenon short-arc lamp[3]
6,500 K Daylight, overcast
5,500–10,500 K LCD or CRT screen
15,000–27,000 K Clear blue poleward sky
These temperatures are merely characteristic;
considerable variation may be present.

As you can see by the colors and corresponding numbers they line up with different light sources which you can select from by merely adjusting the Kelvin scale value up or down according to the type of lighting you are in at the time of exposure. This is the most accurate way to capture white balance, but you must be spot on in your number selection, or your colors and your         whites in the subject of your viewfinder will not accurately be displayed when shot. 

ISO for Digital like ASA for Film_________________________

ISO is the sensitivity of camera's your sensor to gather light and properly expose a shot. At a low ISO setting say 100, your camera will do its best work in gathering the appropriate light for a good shot. You can adjust this up or down as needed. Say you are in a bright sunny location as is your subject. ISO 100 is the superior setting. But let's say you find yourself in a sunny exposure but your subject is not. You might be better off trying a shot at 100, then 200, then even 300 ISO and compare the outcome. Or perhaps you are inside and the ambient light, or existing light without the aid of a flash, is simply insufficient and cause your lens to stay open longer, resulting in perhaps a blurry photo or a darker photo. Here is where you can dial in a best ISO setting. In some cases you'll have to reach up to 800, 1200, 1400, 1800 maybe even higher. However you must remember that by reaching up so high you are introducing so much more sensitivity into your sensor that it is forced to introduce more light matter that it shows up in what is called NOISE. That's nothing short of ugly. When you crop to 100% or more, and cropping is advisable to see what your image looks like when printed, you'll be disappointed. So be careful when pushing the ISO, but in some cases where introducing a flash or speedlite is not allowed, you may be forced to do just that. The end result is if you insist on taking pictures where the ISO is extremely high, your ability to print is replaced by presenting the pics online and small. On the other hand when you can select a setting of the lowest ISO necessary, you'll be able to improve on the camera's auto setting, though I'll admit, cameras today are really quite good at automatically grabbing the proper ISO. So experiment and see what you can come up with. This is the fun of playing with your camera settings. 

Exposure______________________________________________

The idea behind exposure is to balance the available amount of light. for a good, well, exposure. It is an adjustable feature that allows for decreasing or increasing the amount of light using a wheel or a button, so that you don't find your captures over or underexposed, meaning too bright or too dark. Again while the auto setting does a darn good job, this can provide you with the tools to create more light when there is not enough available, or less light when your other settings are gathering more than you desire. When shooting you should see in the viewfinder, assuming you have one, where the needle is, digitally. Merely move the exposure setting to where your capture is turning out that perfect image. And you can, if your camera offers this option, check for Highlight alert in your Histogram 

Aperture______________________________________________

If you want to get more light, or change the depth of field or get a sharper picture, unless you are shooting a movie, your aperture is set by the lens you choose, but in manual mode you can adjust the aperture which again, allows for a wide open lens or a fully stopped down lens. When you do this you are changing the F-stop and shutter speed. What you in effect can do by altering the aperture is bringing in more light, which means a much faster shutter speed and a lower F-stop number (wider lens opening, thus less of a need for a tripod, or you are bringing in less light, which means a much slower shutter speed and a higher F-stop number, thus more need for a tripod, as it now will take the lens much longer to gather the necessary light. Why would you want to alter this setting? Well again, we are in Manual Mode and the reason we do this is to attempt even better shots than in Auto Mode, or we want to achieve something striking, something special, a shot that looks better than normal.

Shutter Speed_________________________________________

With shutter speed you are controlling the ability of the lens to gather light extremely fast or slow. And here as with the aperture, you are adjusting the speed, along with the aperture as well. One goes hand in hand with the other. You cannot make an adjustment using only one element without affecting the other, but these are mentioned separately so you can see how by using one or the other, your ability to gather light and image data, will give you a different effect than keeping the camera in auto mode. Thus you will be capturing a perhaps more creative image for display or print.

Now Go Practice_______________________________________

All of these above settings are fully automatic if you are happy with the camera doing it all. But as I stated above, if you want to gain more control, create effects that can only be created by using these as a means of creativity, you'll enjoy the images you get by toying with all of these. Take your camera out, set to Manual Mode, and don't think of this outing as a chance to get some really great images. Rather use the opportunity to become familiar with the settings, the lens, and the adjustments you can learn from. After awhile, and I don't mean in a single setting, it becomes second nature, if you stick with it.


What is it about adding Wall Art that Makes Your Place so Special

 Cl early it's not just adding any old piece of art What happened to you the first time you entered a home or a business when you knew t...