From Dull to Dramatic Photography
While this may not be dramatic in a bright happy colorful sense it is so, if in a dark and foreboding way. With this subject I will admit it was easier than if I had chosen an image which was bright and colorful with lots of sunlight, still even then one can cause an ordinary image to appear near HDR without all the added work and in many cases the use of software to produce the tonal mapping needed.
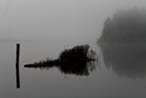
Take this original image of a door within an abandoned barn, with the use of flash.
As you can see the amount of light hitting this well defines all of the aspects of the term abandoned, the failing paint, the rust on the handle, the cobweb within the latch opening and generally the decadent condition overall. This much light reflects really more than I want in this photo, so rather than lowering the exposure and losing too much information (btw this works well in most well-lit sunjects, i.e. lowering exposure, I am not the best at flash adjustments, so I use PP or post production techniques) which I needed to maintain. So after viewing the next photo I'll add a brief tutorial of steps in how I was able to push the image to a harsh and dramatic conclusion.
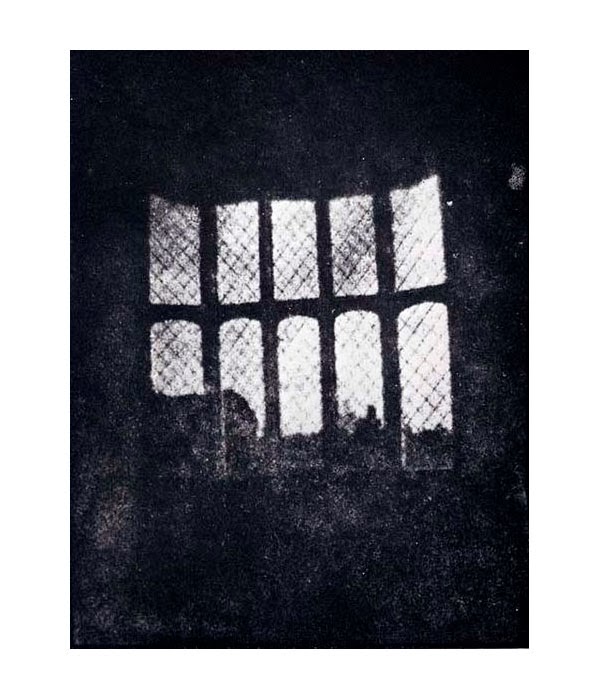
Notice that while you will experience a loss of detail the effect is what is critical. For sheer detail clearly you'll want an entirely different approach. But what this will offer you is a harsh, dramatic, near-HDR look with a few less steps unless of course you purchase the software needed.

As to the steps you can play around with. Because this was a Raw file I first barely increased Exposure to ensure the push I wanted in the highlights. Then I pushed higher Shadows by 25, Brightness by 75 and Contrast by 25. Then I opened and dragged the background down to create a new layer. Now working with the new layer, an exact duplicate of the background, I chose Layer> New Adjustment Layer > Curves and raised the brightness (upper right) by roughly 10%, the middle I left alone and the lower end (lower left) I dropped by about 10% also. The actual numbers are meaningless unless you are working on the image as I write this. But when you approach the effect I did, you'll see a similar result.
Next I used the filter Unsharp Mask in an amount 142%
the Radius I set at 3.7 pixels and the Threshold at 3. This gave me the really harsh tonal qualities I wanted. The I chose Layer > New Adjustment Layer > Levels and moved the left side of the Input level, or the dark side, by dragging the slider to the right till I reached the number 7, and left the other sliders alone.
I Saved For Web setting resolution to 96 and with a Quality of 30 for web use. I always choose 96 rather than 72 because I want both Windows and Apple computers to view this at their equally well.
That's it. Quick, simple with high drama and a bit of darkness added. Quite a difference for such a few steps. If it seems like you are getting the results I did, just keep tweaking the steps until you are happy. There is no magic number setting in any tutorial. Good luck.
Take this original image of a door within an abandoned barn, with the use of flash.
 |
| From Drop Box |
Notice that while you will experience a loss of detail the effect is what is critical. For sheer detail clearly you'll want an entirely different approach. But what this will offer you is a harsh, dramatic, near-HDR look with a few less steps unless of course you purchase the software needed.

As to the steps you can play around with. Because this was a Raw file I first barely increased Exposure to ensure the push I wanted in the highlights. Then I pushed higher Shadows by 25, Brightness by 75 and Contrast by 25. Then I opened and dragged the background down to create a new layer. Now working with the new layer, an exact duplicate of the background, I chose Layer> New Adjustment Layer > Curves and raised the brightness (upper right) by roughly 10%, the middle I left alone and the lower end (lower left) I dropped by about 10% also. The actual numbers are meaningless unless you are working on the image as I write this. But when you approach the effect I did, you'll see a similar result.
Next I used the filter Unsharp Mask in an amount 142%
the Radius I set at 3.7 pixels and the Threshold at 3. This gave me the really harsh tonal qualities I wanted. The I chose Layer > New Adjustment Layer > Levels and moved the left side of the Input level, or the dark side, by dragging the slider to the right till I reached the number 7, and left the other sliders alone.
I Saved For Web setting resolution to 96 and with a Quality of 30 for web use. I always choose 96 rather than 72 because I want both Windows and Apple computers to view this at their equally well.
That's it. Quick, simple with high drama and a bit of darkness added. Quite a difference for such a few steps. If it seems like you are getting the results I did, just keep tweaking the steps until you are happy. There is no magic number setting in any tutorial. Good luck.


I have a question about the use of filters in taking photos. Does it degrade the image by reducing the amount of light in the picture?
ReplyDeleteNot necessarily. It depends on the filter used. A clear or UV filter serves only to protect the lens barrel end glass and does nothing you or I could detect in terms of reducing light. However a CP or Circular-Polaizer may reduce light significantly. It also increases saturation of, most notably, blues and greens. So in a sense yes this type of filter along with all others which are darker than clear, will in fact reduce or diminish the light entering the lens. But remember too that if your purpose is to increase saturation while dropping a too bright subject, then you have increased the image quality as opposed to degrading it. I hope this has helped.
ReplyDeleteYes, thank-you for clarifying the filter issue. A lot of good information. Very helpful.
ReplyDeleteA question regarding taking close-up pictures of subjects indoors. Do u need to use the red-eye reduction if the lighting is not particularly low, but adequate?
ReplyDeleteIf you want to do pictures of subjects at night, how can you clearly show both the subject and the backdrop? Especially if the backdrop is brightly lit, such as a theatre marquee?
ReplyDeleterobinjoslen, thanks for the question. If you are shooting into a lighted source, in your case a marquee sign, and you want your subject lit as well, you must provide a source of light for your subject. I suspect your subject is a friend and if that is the case then usually cameras have popup flash. Perhaps yours is turned in the Off position. If so you'll need to make sure the setting is on the On position. If your flash is working, then you may need more light. If your camera does not support an off-shoe flash, then sometimes all you have is a spotlight-style light such as the ones used for boating or hunting. They refer to these as 1,000,000 candle power hand-held lights. Clearly these may produce far too much light but if you don't have the option of a hot shoe flash, and you have no lights connected or wireless from your DSLR, then it may be your only choice. You can reduce the amount by aiming slightly away. Remember too that if you rely only on the installed camera flash that you may get a red-eye condition. Without the ability to raise or lower your light source you will have to remove the red-eye with software, later.
ReplyDeleteThis comment has been removed by a blog administrator.
ReplyDeleteAnonymous said...
ReplyDeleteA question regarding taking close-up pictures of subjects indoors. Do u need to use the red-eye reduction if the lighting is not particularly low, but adequate?
This depends on the kind of lighting you use and how it is used. Since you didn't mention your camera type, (compact with an attached flash, or digital slr with a hot shoe) I will assume you are referring to the attached flash on a compact digital. The proximity of the attached to the subject's eye is what gives the red-eye effect. If you could tape a business card to the bottom of the flash area, causing the flash to angle upward, so as not to flash directly in the eye of your subject, you would more often than not eliminate or greatly reduce the red-eye effect. With an slr camera, you would attach an off-shoe cord to the hot shoe on the camera, then attach the other end to a flash unit, being hand-held above or to the side accomplishing the same thing.
Thanks for the question and my apology for misplacing your question so long ago.
I should have added, yes using the red-eye reduction setting does help somewhat.
ReplyDelete